Friday, October 25, 2013

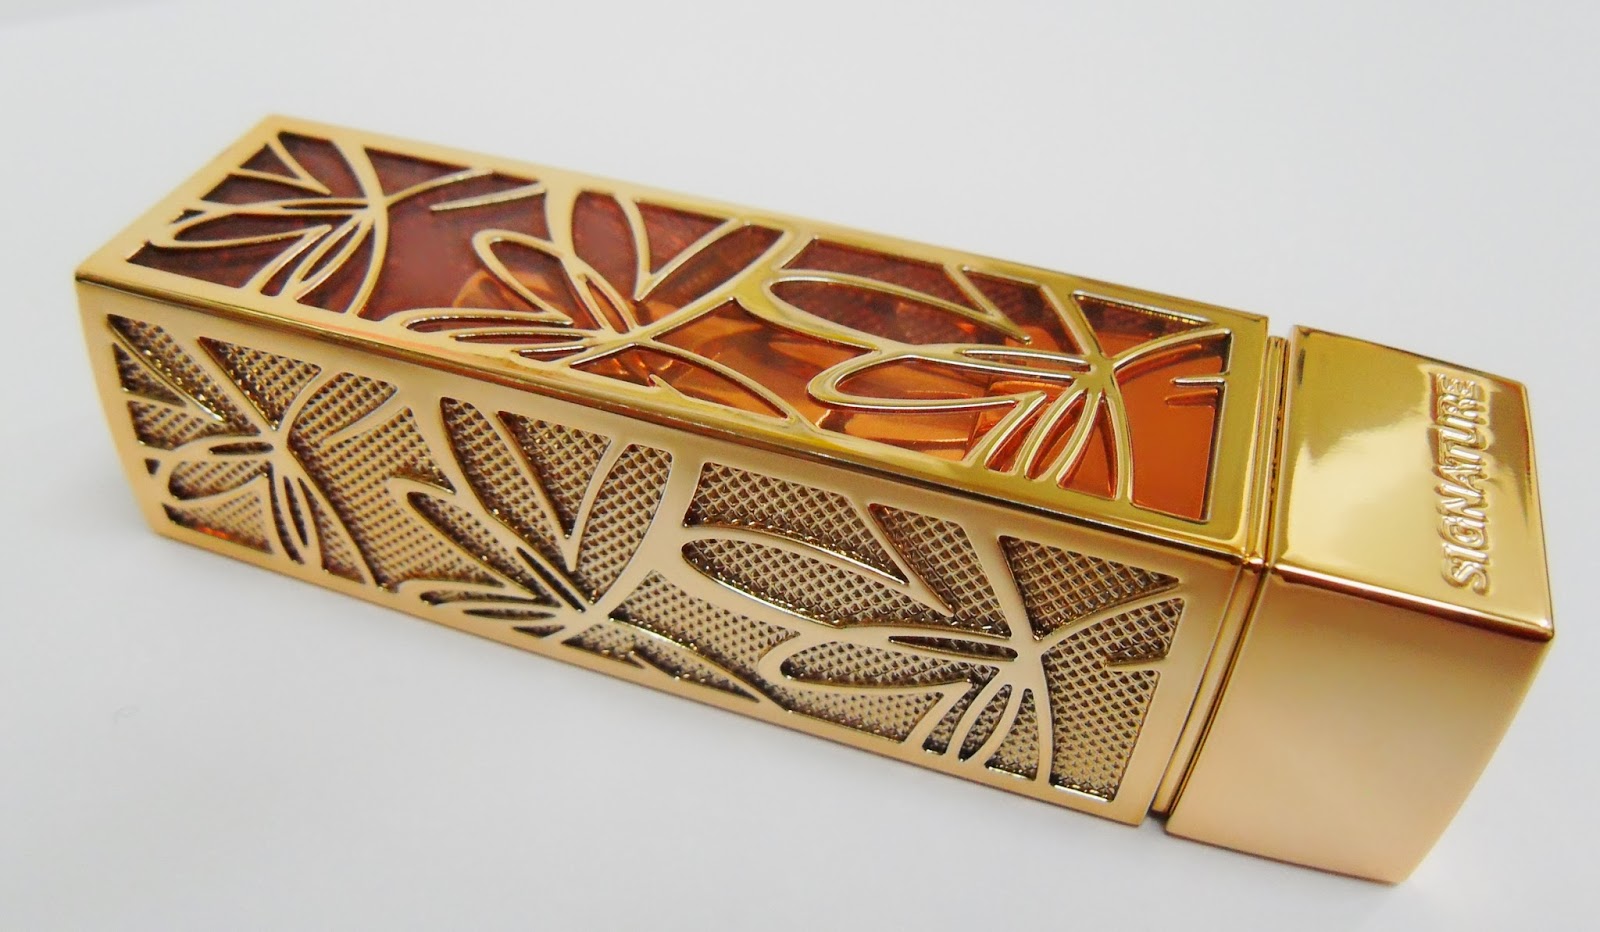
Missha Signature Glam Art Rouge in SPK101 Review

Missha Signature Glam Art Rouge in SPK101
Oh my! My first time to see a lipstick with a design like that! It was hard for me to swatch it initially because I didn't wanna ruin those artistic cuts.

    The box.


The lovely packaging.
I wish that was made of real gold!
 swatch


This lipstick was given to me as a gift months ago and I totally love this, so much that there is only little amount of product left in the bullet now because I use this frequently. The color is a very pretty coral with a hint of pink. It gives a natural looking healthy and pretty lips when worn. 
I also like that it has Spf15 that will at least protect my lips from the sun's harmful rays. 

This is a creamy type of lipstick so the opacity is only 7/10 but I guess that is enough if you are just gonna wear this for a natural makeup look. This shade is perfect for me since I normally just wear light makeup almost all the time and I am a fan of nude and light colored lipsticks. 

I don't drink a lot of water causing my lips to be usually dry, but when I wear this lipstick, my lips feel more moisturized compared to my other lipsticks. The texture is very comparable to the Maybelline Watershine Pure lipstick that I owned before. 

What I don't like about this is that it only lasts for 3-4 hours, and disappears quickly when you eat and drink. I don't mind reapplying but I still hope it would at least leave a tint on my lips. However, creamy lipsticks don't really stay long, do they?
Other than that, I have no other complaints on this lipstick. The price is a little bit higher than other lipsticks from Missha but it's worth it because even the design and packaging look expensive. It really makes a good gift to someone who is a fan of lipsticks, or a gift to yourself :)


How to Get Free Makeup/Cosmetics in the Philippines

credits to Sample Room


If you haven't heard of Sample Room yet, then you better check it out now. It's never too late :)

Sample Room is a website that provides free product samples (which sometimes are in full size) so we, shoppers, get to test/try them first before actually buying them (in case we liked it). What a wonderful idea, right? No more wasting of money on buying cosmetics that might not work for us. Once you register on their website, you'll automatically get 100 points which you can use right away to get the available products of your choice. They also offer VIP membership where you can buy 1000 points for Php599 that can be used for 2 months. If you are a VIP member, you get to grab more products. 

Click here to learn more.

Here are some of the products I've collected from Sample Room that I think worth trying/buying:


Thank you Sample Room!


Thursday, October 24, 2013

The Best Facial Cleanser + Makeup Remover I've Tried So Far


Wearing makeup for me is fun, but it's the opposite when I have to remove everything from my face at the end of the day. It even gets painful at times when I try to erase my tough mascara and eyeliner, as some of my eyelashes fall during the process and my makeup remover stings my eyes. 
Sometimes, even if I use both the power of makeup remover and facial cleanser, there will still be traces of mascara and eyeliner around my eyes.

It's my makeup dilemma. I need to make sure my face is cleansed well, but I also love wearing heavy-duty makeup.  

One month ago, I purchased some products from Lioele Korea and I got this full sized bottle of Jaiya Pure Cleansing Oil for free. It took me about 2 weeks before I started to use this because I have an oily skin, and the name 'cleansing oil' made me think it might make my whole face greasy. I was wrong.

Its promises.
It's a colorless liquid, similar to a syrup in texture, like glycerin. The scent is nice and mild.
It has this neck stopper that prevents product leakage.
It contains 190ml of product.
The instructions and ingredients.

How I use it:

I take 2 or 3 pumps of the product on the palm of my hands and massage it on my dry face. 
I massage thoroughly, adding more product when necessary. I close my eyes while working on my eye area. 
Then, I rinse my face with warm water and pat dry with a clean towel.
Done, that's it. 

This is an oil cleansing method so I'm not supposed to clean my face with anything else other than this. 

The result:
After rinsing, my face feels clean, smooth and soft. All my stubborn makeup is completely gone too. No greasy feeling after as if I didn't use an oil at all.  It is really amazing! The liquid literally dissolves all my makeup. And it is very easy to use. No need for a cotton. Just massage, massage, massage!
Plus,  my eyes didn't get blurry or painful while I was massaging that area, even if I open them.

This cleanser is definitely the best I've tried so far! Now, removing my makeup is not a problem anymore. I'm so glad to have discovered this product.

It can replace both my makeup remover and facial wash. I can also save some cotton pads because I won't be needing that.

I also feel like my skin is healthier with this because I am not stripping off the protective barrier unlike when I use soap or facial foam. 

This is a must-try product!

Review Summary:

Likes:
Effectively removes stubborn makeup with ease
Doesn't leave a greasy feeling
Makes skin feel soft and smooth right after use
Money and time saving since it can take place of two products
Skin-friendly
Didn't cause me breakouts
Smells good

Dislikes:
None


Have you tried any cleansing oil too? What's your best makeup remover?


How to Save a Dried Out Liquid Eyeliner


I bought this liquid eyeliner from Kokuryu because a friend has told me that it's good and that it is a rubberized kind of eyeliner. That was the first time I have heard of a liquid eyeliner that is rubberized, and I actually couldn't imagine how it works. I was really curious.
So when I saw this at Kokuryu makeup counter, I bought one without hesitation.
What disappointed me initially was when I tested the product when I got home. It isn't expired but the liquid was thick and almost dry. It is cheap at Php174 but I don't want my money to get wasted. I started to think of what I can do to save it, if possible.
Then I looked at the ingredients:

One of them is propylene glycol. This substance is being used as base in e-liquid for e-cigarette. It is similar to vegetable glycerin, which is also used as e-liquid base. Between the two, vegetable glycerin is thicker. I don't have propylene glycol but I do have vegetable glycerin in the kitchen. Glycerin is used as moisturizer so I thought maybe it would bring back the moisture in my eyeliner. And so my experiment began.
I didn't take 'before' pictures because I wasn't sure it would work.
What I did was:
1. I put 5 drops of v. glycerin in the eyeliner. Then I closed it tightly.
2. I heated a cup of water in the microwave.
3. I soaked the eyeliner container in the hot water until it started to cool down. Then I took it out of the water and wiped it dry.

Did it work? Yes! The texture of the eyeliner has become thin and runny again and I can finally draw decent lines. (Too bad I didn't take a picture of how it looked like when the eyeliner was dry.)


As for the product quality, I think it's an ok product. The brush is good and the eyeliner is sweat-proof, and is also oil-proof. (I say oil-proof because It was hard to remove it with my oil based makeup remover) It even kind of got glued to my lashes and it hurt while I was removing it. Another thing is, when you make a little mistake while applying it and you tried to erase that little mistake, you'll end up ruining all the lines you've drawn and it's because of the rubberized texture.

I don't think I'm going to use this again. My experience with this product was not a good one. Maybe I'll just give this away to my sister. She's not as picky as me when it comes to eyeliners.


Saturday, August 3, 2013

Review: Dr. Jart Silver Label Rejuvenating BB Cream


This bb cream has always been one of my favorites. Whenever people with oily skin ask me what bb cream I can recommend to them, I always mention this one. I like it so much because it has almost all the qualities I'm looking for in a bb cream. I have been using this for a long time already and hasn't caused me any breakouts. Although you have to remember that our skin may react differently to a certain beauty product. One may work very well for me, but not for others.

Let's now get into details.


Dr. Jart Silver Label Rejuvenating BB Cream comes in a simple silver tube with black cap. Personally, I prefer bb creams that come in tubes with pump because that is more hygienic.

It promises to give a flawless look to skin, conceal blemishes, activate skin rejuvenation, whiten skin, soothe red irritated skin, control oil and at the same time moisturize. Wow, that's a lot right?
I don't know about skin rejuvenation and whitening but, it does really make my skin look flawless and less oily, and it evens out my skin tone. 

One very noticeable thing is that it conceals the pores on my nose well that I can even skip using pore balm. This is a very big plus to me because some bb creams tend to emphasize pores instead of hiding them.


The cream itself is thick, so if you have dry skin, I suggest you use moisturizer first before applying this so you'll be able to blend it easily and smoothly on your face. I also suggest using a stippling brush rather than ordinary foundation brush. Stippling brush makes it easier for me to blend bb creams up to my hair line.


photos taken at different lighting (pls excuse my uncombed hair)
Naturally, I have visible veins and some pimple marks on my cheeks, but you cannot see them in the pictures. That proves that the coverage is really good, almost foundation-like.


This comes only in 1 shade and has grayish undertone. At first application, it looks too light for me. It takes about 20 minutes until it finally matches my skin tone. Thankfully, the grayish color doesn't show at all. My face looks a bit brighter and I like that. I still wish that the undertone was yellowish, though.

 Is it moisturizing? Not much. I have oily t-zone so it doesn't really matter to me. I always use moisturizer before putting on makeup anyway.


Summary Review

Likes:
Good coverage (no need for a concealer for minor blemishes)

Good oil control (i find it best to set it with palgantong powder)
Semi-matte finish (I have combination skin so this is a good thing for me)
Feels light and not cakey despite the good coverage
Long Lasting  (with the help of my primer too)
Doesn't have strong scent
Didn't cause me breakouts

Dislikes:
Comes only in one shade (suits only light to medium skin tone)
Packaging doesn't come with pump 
Has grayish undertone (If only the undertone was yellow it would be perfect!)
Kinda pricey 


If you have oily/combination skin with blemishes and on the search for a good bb cream, I suggest you try this.
I hope you like it too, as much as I do. Good luck! :)


Monday, July 29, 2013

Tips on How to Groom Your Eyebrows

This is not going to be a very detailed tutorial. I just want to share some tips on how to groom eyebrows in an easier way, without beating around the bush. 

Let's get started!

What you'll need:
1. curved cuticle scissors
2. blade/ eyebrow razor
3. white eyeliner
4. tweezers 
5. eyebrow pencil/powder


First: Use the white eyeliner to draw lines around your brows according to the shape you want. This prevents you from over-plucking/over-shaving your brows. Matte eyeliner is better but I don't have any so I just used the shimmery one that I have in my makeup kit.


Second: Using an eyebrow razor, shave the brow hairs outside the lines. (I prefer using that blade in the picture but if you use that, you need to have a light hand and be very, very careful so you don't accidentally cut your skin)
You can also use tweezers to pluck but personally, I prefer shaving. When you constantly pluck your brow hair, soon, they will stop regrowing. I'm afraid of having bald brows when I get older.

Third: Get a cotton pad, moisten it with makeup remover, and use that to erase the white lines you drew. 
If you see some extra long brow hair, trim them using the cuticle scissors.

Lastly: With a light hand, fill in the spaces with an eyebrow pencil/powder that is one shade lighter than your hair color. That will give a fuller look to your brows. Remember, your eyebrows don't really need to be very identical, but they need to at least look similar.


left brow before and after

right brow before and after

And here's the final look. I used only an eyebrow powder here.


Hope that helps! :)


Sunday, July 28, 2013

Reunited With My Blog


It's been a year and 7 months since my last post here. A lot has changed and happened within those times I separated myself from blogging. I didn't even decide or plan to stop. It's just that a lot of opportunities came knocking and I had to choose my best priorities. I became very, very busy. 


Then, I got inspired to blog again. 

The idea of creating a new blog from the scratch came to me but I ended up just sticking to this old one. I deleted all my old posts because a lot about me have changed, and those old posts don't reflect me anymore. 

I'll probably be writing mostly about things related to beauty just like before, because that's what interests me most. I'll also share makeup tips and other DIY ideas. 


"No expectations, no prejudgment. Like a butterfly flies from its cocoon into a fresh new beginning, don't let your past be your tour guide.